PyQt QHBoxLayout를 사용하여 위젯을 수평으로 정렬하는 방법을 알아봅니다.
PyQt 레이아웃은 부모 위젯에 자식 위젯을 정렬하는 방법을 정의합니다.
PyQt는 다양한 레이아웃 클래스를 지원하며 각 클래스에는 특정 상황에 맞는 레이아웃 전략이 있습니다.
레이아웃 클래스를 사용하는 단계는 다음과 같습니다.
- 먼저 레이아웃 클래스에서 레이아웃 개체를 만듭니다.
- 둘째, setLayout()메서드를 사용하여 레이아웃 개체를 부모 위젯의 layout 속성에 할당합니다.
- 셋째, layout 객체의 addWidget()방법을 사용하여 레이아웃에 위젯을 추가합니다.
또한 addLayout()를 사용하여 레이아웃에 레이아웃을 추가할 수 있습니다. 이렇게 하면 위젯을 정렬하기 위한 더 복잡한 레이아웃을 만들 수 있습니다.
PyQt QHBoxLayout 소개
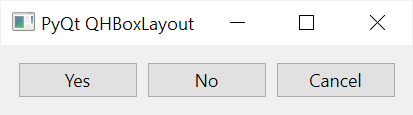
QHBoxLayout는 부모 위젯을 가로 상자로 나누고 자식 위젯을 왼쪽에서 오른쪽으로 순차적으로 배치합니다.
다음 프로그램은 를 사용하는 방법을 보여줍니다.
import sys
from PyQt6.QtWidgets import QApplication, QWidget, QPushButton, QHBoxLayout


class MainWindow(QWidget):
    def __init__(self, *args, **kwargs):
        super().__init__(*args, **kwargs)

        self.setWindowTitle('PyQt QHBoxLayout')

        # create a layout
        layout = QHBoxLayout()
        self.setLayout(layout)

        # create buttons and add them to the layout
        titles = ['Yes', 'No', 'Cancel']
        buttons = [QPushButton(title) for title in titles]
        for button in buttons:
            layout.addWidget(button)

        # show the window
        self.show()


if __name__ == '__main__':
    app = QApplication(sys.argv)
    window = MainWindow()
    sys.exit(app.exec())Code language: Python (python)
출력:
작동 방식.
먼저 QHBoxLayout개체를 만듭니다.
layout = QHBoxLayout()Code language: Python (python)둘째, setLayout()메서드를 호출하여 MainWindow레이아웃을 설정합니다.
self.setLayout(layout)Code language: Python (python)셋째, QPushButton을 사용하여 세 개의 버튼을 만들고 addWidget()를 사용하여 레이아웃에 추가합니다.
titles = ['Yes', 'No', 'Cancel']
buttons = [QPushButton(title) for title in titles]
for button in buttons:
    layout.addWidget(button)Code language: Python (python)
목록 이해를 사용하여 제목 목록을 기반으로 세 개의 푸시 버튼을 만듭니다.
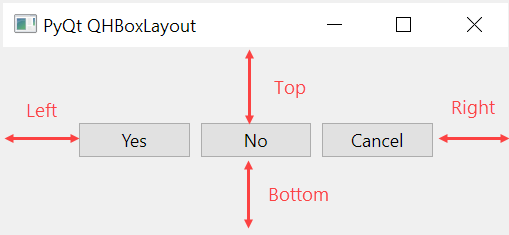
정렬
부모 위젯에 자식 위젯을 위한 더 많은 공간이 있으면 자식 위젯은 다음과 같이 가로로 늘어납니다.

하위 위젯을 기본 크기로 유지하고 수평으로 정렬하려면 수평 스페이서를 사용합니다.
왼쪽 정렬
버튼을 상위 위젯의 왼쪽에 정렬하려면 QHBoxLayout에 하위 위젯 뒤에 수평 스페이서를 추가합니다. 예를 들어:

이 예에서 수평 스페이서는 레이아웃 끝까지 늘어나고 버튼을위한 충분한 공간을 남겨 둡니다.
레이아웃 끝에 가로 스페이서를 추가하려면 레이아웃에 모든 단추를 추가한 후 addStretch()메서드를 호출합니다.
import sys
from PyQt6.QtWidgets import QApplication, QWidget, QPushButton, QHBoxLayout


class MainWindow(QWidget):
    def __init__(self, *args, **kwargs):
        super().__init__(*args, **kwargs)

        self.setWindowTitle('PyQt QHBoxLayout')

        # create a layout
        layout = QHBoxLayout()
        self.setLayout(layout)

        # create buttons and add them to the layout
        titles = ['Yes', 'No', 'Cancel']
        buttons = [QPushButton(title) for title in titles]
        for button in buttons:
            layout.addWidget(button)

        # add a spacer
        layout.addStretch()

        # show the window
        self.show()


if __name__ == '__main__':
    app = QApplication(sys.argv)
    window = MainWindow()
    sys.exit(app.exec())

Code language: Python (python)
오른쪽 정렬
마찬가지로 레이아웃의 시작 부분에 스페이서를 추가하여 버튼을 오른쪽으로 밀 수 있습니다.

이렇게 하려면 레이아웃에 단추를 추가하기 전에 addStretch()메서드를 호출합니다.
import sys
from PyQt6.QtWidgets import QApplication, QWidget, QPushButton, QHBoxLayout


class MainWindow(QWidget):
    def __init__(self, *args, **kwargs):
        super().__init__(*args, **kwargs)

        self.setWindowTitle('PyQt QHBoxLayout')

        # create a layout
        layout = QHBoxLayout()
        self.setLayout(layout)

        # add a spacer
        layout.addStretch()

        # create buttons and add them to the layout
        titles = ['Yes', 'No', 'Cancel']
        buttons = [QPushButton(title) for title in titles]
        for button in buttons:
            layout.addWidget(button)

        # show the window
        self.show()


if __name__ == '__main__':
    app = QApplication(sys.argv)
    window = MainWindow()
    sys.exit(app.exec())

Code language: Python (python)
가운데 정렬
단추를 가운데에 정렬하려면 레이아웃의 시작 부분에 수평 스페이서를 하나 추가하고 끝 부분에 다른 하나를 추가합니다.

이렇게 하려면 레이아웃에 버튼을 추가하기 전과 후에 addStretch()메서드를 호출합니다.
import sys
from PyQt6.QtWidgets import QApplication, QWidget, QPushButton, QHBoxLayout


class MainWindow(QWidget):
    def __init__(self, *args, **kwargs):
        super().__init__(*args, **kwargs)

        self.setWindowTitle('PyQt QHBoxLayout')

        # create a layout
        layout = QHBoxLayout()
        self.setLayout(layout)

        # add a spacer
        layout.addStretch()

        # create buttons and add them to the layout
        titles = ['Yes', 'No', 'Cancel']
        buttons = [QPushButton(title) for title in titles]
        for button in buttons:
            layout.addWidget(button)

        # add a spacer
        layout.addStretch()

        # show the window
        self.show()


if __name__ == '__main__':
    app = QApplication(sys.argv)
    window = MainWindow()
    sys.exit(app.exec())
Code language: Python (python)
위젯 사이에 수평 스페이서 배치
위젯 사이에 수평 스페이서를 배치하여 레이아웃의 왼쪽과 오른쪽으로 푸시할 수 있습니다.

import sys
from PyQt6.QtWidgets import QApplication, QWidget, QPushButton, QHBoxLayout


class MainWindow(QWidget):
    def __init__(self, *args, **kwargs):
        super().__init__(*args, **kwargs)

        self.setWindowTitle('PyQt QHBoxLayout')

        # create a layout
        layout = QHBoxLayout()
        self.setLayout(layout)

        # create buttons and add them to the layout
        titles = ['Yes', 'No', 'Cancel']
        buttons = [QPushButton(title) for title in titles]

        # add the buttons
        layout.addWidget(buttons[0])
        layout.addWidget(buttons[1])

        # add a spacer
        layout.addStretch()

        # add the cancel button
        layout.addWidget(buttons[2])

        # show the window
        self.show()


if __name__ == '__main__':
    app = QApplication(sys.argv)
    window = MainWindow()
    sys.exit(app.exec())

Code language: Python (python)
레이아웃 스트레치 인수 설정
기본적으로 하위 위젯은 기본 크기를 사용합니다. 하위 위젯이 늘릴 수 있는 공간을 설정하려면 QHBoxLayout 객체의 setStretchFactor() 메소드를 호출합니다.
setStretchFactor(widget, factor)예를 들어 Yes 및 No 버튼을 같은 크기로 만들고 스트레치 팩터를 사용하여 Cancel 버튼보다 두 배 많은 공간을 차지할 수 있습니다.

import sys
from PyQt6.QtWidgets import QApplication, QWidget, QPushButton, QHBoxLayout


class MainWindow(QWidget):
    def __init__(self, *args, **kwargs):
        super().__init__(*args, **kwargs)

        self.setWindowTitle('PyQt QHBoxLayout')

        # create a layout
        layout = QHBoxLayout()
        self.setLayout(layout)

        # create buttons and add them to the layout
        titles = ['Yes', 'No', 'Cancel']
        buttons = [QPushButton(title) for title in titles]
        for button in buttons:
            layout.addWidget(button)

        # set the stretch factors
        layout.setStretchFactor(buttons[0], 2)
        layout.setStretchFactor(buttons[1], 2)
        layout.setStretchFactor(buttons[2], 1)

        # show the window
        self.show()


if __name__ == '__main__':
    app = QApplication(sys.argv)
    window = MainWindow()
    sys.exit(app.exec())
Code language: Python (python)
위젯 사이의 간격 설정
기본적으로 QHBoxLayout는 하위 위젯 사이에 기본 공간을 설정합니다. 그들 사이의 공백을 변경하려면 QHBoxLayout객체의 setSpacing()메소드를 사용합니다.
다음 예제에서는 setSpacing()메서드를 사용하여 단추 사이의 공백을 50px로 설정합니다.

import sys
from PyQt6.QtWidgets import QApplication, QWidget, QPushButton, QHBoxLayout


class MainWindow(QWidget):
    def __init__(self, *args, **kwargs):
        super().__init__(*args, **kwargs)

        self.setWindowTitle('PyQt QHBoxLayout')

        # create a layout
        layout = QHBoxLayout()
        self.setLayout(layout)

        # create buttons and add them to the layout
        titles = ['Yes', 'No', 'Cancel']
        buttons = [QPushButton(title) for title in titles]
        for button in buttons:
            layout.addWidget(button)

        layout.setSpacing(50)

        # show the window
        self.show()


if __name__ == '__main__':
    app = QApplication(sys.argv)
    window = MainWindow()
    sys.exit(app.exec())
Code language: Python (python)
콘텐츠 여백 설정
기본적으로 QHBoxLayout는 하위 위젯에 대한 특정 왼쪽, 위쪽, 오른쪽 및 아래쪽 여백을 설정합니다. 여백을 변경하려면 setContentsMargins()를 사용합니다.
setContentsMargins(self, left: int, top: int, right: int, bottom: int) -> NoneCode language: PHP (php)다음 예제에서는 setContentsMargins()를 사용하여 하위 위젯의 왼쪽, 위쪽, 오른쪽 및 아래쪽 여백을 설정합니다.
import sys
from PyQt6.QtWidgets import QApplication, QWidget, QPushButton, QHBoxLayout


class MainWindow(QWidget):
    def __init__(self, *args, **kwargs):
        super().__init__(*args, **kwargs)

        self.setWindowTitle('PyQt QHBoxLayout')

        # create a layout
        layout = QHBoxLayout()
        self.setLayout(layout)

        # create buttons and add them to the layout
        titles = ['Yes', 'No', 'Cancel']
        buttons = [QPushButton(title) for title in titles]
        for button in buttons:
            layout.addWidget(button)

        layout.setContentsMargins(50, 50, 50, 50)

        # show the window
        self.show()


if __name__ == '__main__':
    app = QApplication(sys.argv)
    window = MainWindow()
    sys.exit(app.exec())
Code language: Python (python)
요약
- QHBoxLayout는 부모 위젯을 가로 상자로 나누고 왼쪽에서 오른쪽으로 순차적으로 배치하는 데 사용합니다.
- QHBoxLayout개체의 addStretch()메서드를 사용하여 레이아웃에 가로 스페이서를 추가하여 자식 위젯을 왼쪽, 오른쪽 또는 가운데에 맞춥니다.
- QHBoxLayout개체의 setStretchFactor()메서드를 사용하여 자식 위젯의 스트레치 인수를 설정합니다.
- QHBoxLayout개체의 setSpacing()메소드를 사용하여 자식 위젯 사이의 공백을 설정하십시오.
- QHBoxLayout개체의 setContentsMargins()메서드를 사용하여 왼쪽, 위쪽, 오른쪽 및 아래쪽 여백을 설정합니다.
'프로그래밍 > 파이썬' 카테고리의 다른 글
| 파이썬 Python QT PyQt QVBoxLayout (0) | 2023.06.22 |
|---|---|
| 파이썬 Python QT PyQt QRadioButton (0) | 2023.06.22 |
| 파이썬 Python QT PyQt QGridLayout (0) | 2023.06.22 |
| 파이썬 Python QT PyQt QFormLayout (0) | 2023.06.22 |
| 파이썬 Python QT PyQt QPushButton (0) | 2023.06.21 |